The display is very crisp and easy to read from wide angles. The backlight is a cool blue color (the color can be changed) when receiving and switches to red when in transmit. The switching to red in transmit can be switched off in the menu if it bothers you when sending CW. The display will turn green when in the remote mode. There is a lot of information packed into the display area, but the small space is used well to show the operational state of the transceiver. CW decoding can be done in the radio and decoded message will scroll across the display.
There are two VFO’s that can be assigned to operate in split mode. There is also 199 memory locations available in the FDM-DUO that can be programmed via the front panel and customized in the Memory Manager Feature provided in the FDM-SW2 software to add alphanumeric labels. There are also 20 quick memories that allow you to immediately store a frequency from the FDM-DUO’s front panel.
Overall the ergonomics of the FDM-DUO are very good and well thought out for a radio of this size.
FDM-DUO Standalone Use
A very nice feature of the FDM-DUO is it’s ability to act as a standalone transceiver. This great if you just want to turn the radio on and operate without fussing with a computer such as using the radio for backpacking or camping. Currently there are very few direct sampling SDR transceivers that can be used this way. However, more may show up in the future since this arrangement allows for easy use for those who are new to SDR and the ability to turn the radio into a more advanced SDR system when coupled to FDM-SW2 software. No more having decide if you want the convenience versus a SDR radio that has to be constantly tied to a computer since the FDM-DUO offers both.
One thing you will notice immediately when turning the FDM-DUO is it’s super quiet noise floor until a signal comes booming through out of nowhere. The FDM-DUO is very sensitive and is very good about rejecting adjacent signal interference with judicious use of the filter setting on the front panel. The receive filter offers several selections 1600 -3100Hz, 4000Hz, 5000Hz, 6000Hz, Data 300Hz, 600Hz, and 100Hz. The selectable filters will vary a bit depending on the receive mode. When used with a modest 20M dipole there was no problems with front end overload. However, you can switch off the AGC circuit in the FDM-DUO and adjust the RF gain manually. If you have the manual RF gain turned up too high you will get overloading from stronger stations. With AGC switched on, this does not happen. Nonetheless, the manual gain setting is still a handy feature because it may allow you to increase the gain just enough to hear a very weak signal. The Noise Reduction also works reasonably well and can improve the ability to hear a weak signal down in the noise. The Auto Notch filter worked as expected. Didn’t get a chance to test the Noise Blanker. Overall, the receive performance was very good to excellent.
Again the audio quality from the small internal speaker is ok, but for long listening or operating sessions you are probably going to want headphones or an external speaker. The audio quality from the headphone jack or Aux jack is excellent.
Transmitting is as easy as plugging in the included microphone to the back of the FDM duo or a CW key. Power settings are 0.3, 0.5, 1.0, 1.2,1.5,2.0, 3.0, 4.0, 5.0, and Max watts. The Max setting will give you something between 8 and 10 Watts. There are few items you can tweak for transmission such as mic gain, compression, canned CW messages, etc. Overall, audio reports were very good.
FDM-DUO as a SDR Radio
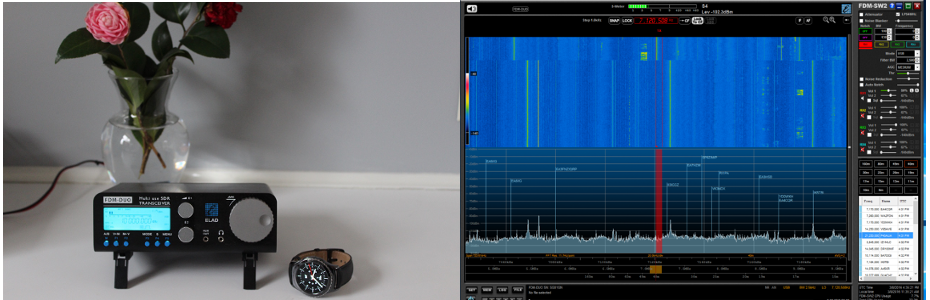
Let’s shift over to discussing the FDM-DUO’s alternate personality as a SDR transceiver. When coupled to the included FDM-SW2 software the little FDM-DUO becomes a SDR powerhouse. As mentioned earlier the FDM-SW2 is the most polished feature rich SDR program currently available. Again, as with the FDM-DUO itself, the FDM-SW2 is well thought out and designed. Since there are so many features in the program, we will just hit some of the high points.
Installation
Could not be easier. Just plug the USB cables into your computer and install the software. Thats it.
Operating Configurations
This is where things can get a little complex until you get your head around it. The FDM-DUO can be configured to slice and dice it’s 6MHz of bandwidth in several ways through the Settings / Advanced menu. Elad refers to “multiple receivers” in it’s documentation or VRX (Virtual Receiver). Basically this is what most of us would refer to as a “VFO”. So here on out we will just refer to the VRX as a VFO for a little extra clarity. There is only one hardware receiver the FDM-DUO, but the FDM-SW2 software allows for 4 VFOs for each software receiver. When operated in 2 channel mode, the FDM-SW2 software will allow for 2 independent software receivers that can independently receive on any frequency from10KHz – 54MHz. When you look at some of the configuration selections you will notice a reference to some of the bandwidth allocated to “remote”. It appears that this feature is not fully implemented yet. One would assume that this may be for a remote PC running the FDM-SW2 to be able to access the FDM-DUO remotely via a network connection. You can access the FDM-DUO and it’s audio stream via a web browser as outlined in the FDM-SW2 documentation. However, this method is very basic but functional. Lets go over the configurations:
- The default configuration out of the box is for 1 software receiver at 192kHz bandwidth with the FDM-DUO running as an independent standalone receiver. So for example you could be using the FDM-DUO to work PSK-31 with a laptop attached to the CAT and TX USB ports while using the FDM-SW2 software to listen to CW. As long as everything is in the same 192kHz of bandwidth.
- A single software receiver with a bandwidth of 384kHz.
- A single software receiver with a bandwidth of 768kHz
- A single software receiver with a bandwidth of 1546MHz
- A single software receiver with a bandwidth of 3072MHz
- A single software receiver with a bandwidth of 6144MHz
- Two indépendant software receivers each with a bandwidth of 192kHz
- Two indépendant software receivers each with a bandwidth of 384kHz
One nice thing about this arrangement is that you can scale the bandwidth to the computer hardware you are using. For example if you are using one of the newer inexpensive windows tablets or laptops that has an Atom based processor or Celeron processor, you can use it fine at the 192kHz sampling rate. However you mind find that going to 384kHz may be pushing things a bit. If you get dropped or crackling audio on receive then you know your computer may be lagging at bit. Of course this can vary depending on your particular device’s internal memory or other internal specs. Usually if you are running something equivalent to a core i3 processor, you should be good up to the full 6MHz.
Very great revive, thanks. It looks like a “must have” radio. I want one.
Since I first saw this radio at Dayton in 2014, I thought that this was THE way to build a radio. I’ve had mine for over a year, and still discover hidden gems.
Have had this radio since last christmas and I am very pleased. The undersampling and 0dBm out is a gem for the experementing ham ! The learning curve is a bit steep, hope someone writes a book (like Fred Cady´s on the KX3) for a more easy to read tutorial manual. So many good things in this box,but the crisp RX/TX audio and the filters are specially worth mentioning. And AT LAST a radio with no spurs tuning forward or backwards when exploring the bands,not even when hooked to a computer.
In all very pleased, Carl , Sweden.
With that additonal receiver antenna connector can you set the radio to listen on one antenna and transmit on another and have receiver muting automatic on QSK transmit?
Only had this excellent rig a few days. It does take a little getting used to. The only negative for me at the moment is the audio from the Inbuild speaker. Obviously with a small speaker I don’t expect hi fi, but the volume output is very low even with GAIN turned up. With the phones plugged in…brilliant, but if I took it portable as a stand alone and forgot the phones…! In the shack I use the phones plugged into the phone socket of the PC powered speakers…excellent! Still experimenting with the great software.